Color Picker PCF Control
Color Picker
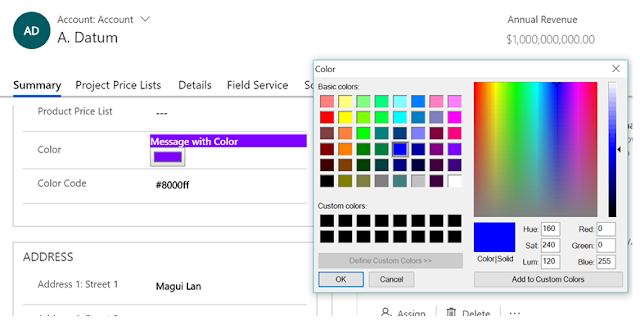
PCF control allows the user to pick the color and changes the background color of the message with
selected color. It also displays the color code of the color selected.
We will walk through
the steps of creating Color Picker control and using it in Dynamics 365.
Creating Control Project
1. Open Visual Studio 2017 command
prompt and execute the below command to create a new PCF project.
namespace – namespace for controls Eg SriramControls
name – Name of the control
template – field or dataset. For this control we will chose
field template.
This will create a folder called ColorPicker and inside this folder we have 2 files: ControlManifest.Input.xml and index.ts
This will create a folder called ColorPicker and inside this folder we have 2 files: ControlManifest.Input.xml and index.ts
2.
Run “npm install” to install the dependencies.
Understanding the Manifest
file
Manifest file is a metadata file that defines the component.
It contains:
- Data that can be configured, field or dataset
- Properties of control that can be configured in CRM UI by the user.
- List of resource files that the component needs
<?xml version="1.0" encoding="utf-8" ?>
<manifest>
<control namespace="SriramControls" constructor="ColorPicker" version="0.0.3" display-name-key="SriramControls.ColorPicker" description-key="Color
Picker Control by Sriram" control-type="standard">
<property name="color" display-name-key="Color" description-key="Default
Color." of-type="SingleLine.Text" usage="bound" required="true" />
<resources>
<code path="index.ts" order="1"/>
<!-- UNCOMMENT TO ADD MORE RESOURCES
<css
path="css/ColorPicker.css" order="1" />
<resx
path="strings/ColorPicker.1033.resx" version="1.0.0" />
-->
</resources>
</control>
</manifest>
Property node defines a configurable piece of data that
control expects from CRM UI.
Understanding the index.ts
file
Index.ts contains the source for the Color Picker custom component. It
contains following methods:
init – Used to initialize the control instance
updateview - Called when any value in the property bag has
changed.
Getoutputs – Called by the framework prior to control
receiving new data
Destroy – called when the control is to be removed from DOM.
Building and testing
control
Once we have developed the code for the control, we can
build using the command “npm run build”.
After building, we can test the control locally before deploying
to CRM using “npm start” command which opens the control in browser.
Deploying the control
to CRM
1 Create a CDS solution project using command
below:
pac
solution init --publisherName sriramcontrols -–customizationPrefix sbctl
2 Add control reference to CDS project using the following
command
3 Execute the following commands to generate
solution file which can be deployed to CRM.
msbuild /t:restore
msbuild
4 Import the solution file to CRM and publish customizations.
Use the PCF control on CRM Form
1 Create a custom field called Color with type Single
Line of Text and drop it twice on
Account Form. Rename the Display name of second field as “Color Code”
2 Select the Color field properties and Add
Control and chose ColorPicker Control
3 Select Web, Phone and tablet as shown below.
4 Navigate to Account Form in CRM and click on Color
and pick color. This will change the color of message and also display the
Color Code.
You can find source for this control at
Github.


Can you upload a managed solution too?
ReplyDelete